
Understanding Vapor Barrier Installation
When it comes to maintaining a healthy and efficient home, one critical aspect often overlooked is the crawl space. An essential part of this is Vapor Barrier Installation, which can protect your home from moisture-related issues. This comprehensive guide will explore what vapor barriers are, their importance, and how to properly install one to ensure your home remains free of moisture-related problems.
What is a Vapor Barrier?
A vapor barrier is a material used to prevent moisture from seeping into areas of your home, particularly in crawl spaces and basements. Typically made from polyethylene plastic sheets, these barriers serve as a critical line of defense against humidity, condensation, and water intrusion. By blocking the passage of water vapor, vapor barriers help maintain a stable indoor environment.
Importance of Vapor Barrier Installation
Vapor barriers are essential for several reasons:
- Prevents Mold Growth: High levels of moisture create a perfect breeding ground for mold and mildew. By controlling humidity levels, vapor barriers effectively reduce the risk of mold-related health issues.
- Improves Air Quality: Moisture in the crawl space can lead to poor indoor air quality, affecting the health of occupants. Proper installation of a vapor barrier enhances air quality by minimizing dust mites and other allergens.
- Improves Energy Efficiency: A vapor barrier helps keep conditioned air within the living space and maintains a consistent temperature, which can lower heating and cooling costs.
Common Myths about Vapor Barriers
Various misconceptions surround vapor barriers. Here are some common myths debunked:
- Myth 1: Vapor barriers are unnecessary in dry climates. Fact: Regardless of climate, moisture can still penetrate and affect structures, making vapor barriers crucial.
- Myth 2: All vapor barriers are the same. Fact: There are different materials and thicknesses suited for various applications.
- Myth 3: Installing a vapor barrier is a one-time solution. Fact: Regular checks and maintenance are necessary to ensure continued efficiency and performance.
Choosing the Right Material for Vapor Barrier Installation
Types of Vapor Barrier Materials
Various materials can be used as vapor barriers, each with its unique characteristics:
- Polyethylene Film: The most common material, available in various thicknesses. It’s lightweight and easy to install.
- Foil: Reflective foil vapor barriers can also act as radiant barriers, reflecting heat away.
- Spray-on Products: These provide a seamless barrier but may require professional installation.
Factors to Consider When Selecting Materials
When selecting the appropriate material for vapor barrier installation, consider the following factors:
- Thickness: Thicker materials generally offer better moisture resistance.
- Durability: Choose moisture-resistant products that stand up to wear and tear.
- Application Environment: Consider the conditions of your crawl space, such as temperature fluctuations and moisture levels.
Cost Analysis of Various Options
The cost of vapor barrier installation can vary based on the material selected and the size of the area:
- Polyethylene Film: Usually the most cost-effective option, prices can range from $0.15 to $0.25 per square foot.
- Foil: Costs for foil barriers generally range from $0.30 to $0.50 per square foot, depending on the type and quality.
- Spray-on Products: These can be more expensive, ranging from $1 to $3 per square foot, but offer advanced sealing capabilities.
Preparing for Vapor Barrier Installation
Assessing Your Crawlspace Condition
Before installation, it’s vital to assess the condition of your crawlspace. Look for:
- Signs of existing moisture problems, like mold growth or musty odors.
- Structural integrity of the foundation and any wood elements.
- Drainage issues that could exacerbate moisture ingress.
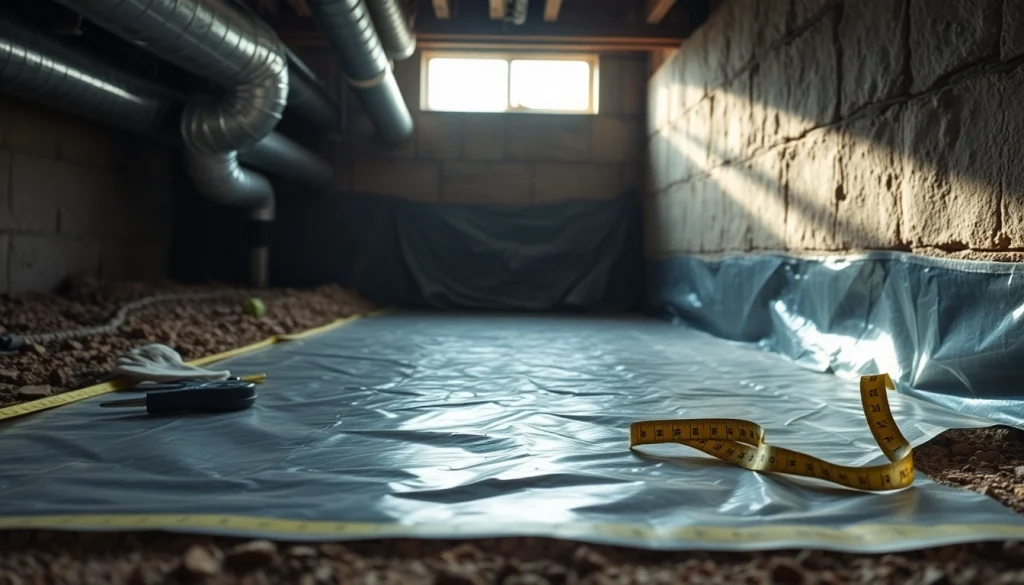
Tools Required for Effective Installation
Having the right tools will make your vapor barrier installation more efficient:
- Utility knife for cutting the barrier material.
- Measuring tape for accurate sizing.
- Stapler and heavy-duty staples for securing the barrier.
- Adhesive tape for sealing seams and repairs.
- Protective attire including gloves and masks.
Safety Precautions During Installation
Taking safety precautions is vital when installing a vapor barrier:
- Always wear gloves and a mask to avoid skin irritation and inhalation of dust.
- Ensure proper ventilation in the crawlspace, especially when using adhesive products.
- Be cautious when navigating tight spaces to avoid injury.
Step-by-Step Process for Vapor Barrier Installation
Initial Cleanup and Inspection
The first step in vapor barrier installation involves cleaning the crawl space:
- Remove any debris, old insulation, or existing barriers.
- Inspect for signs of pest infestation or mold and take necessary actions.
- Ensure proper ventilation and address any water issues before proceeding.
Laying Down the Vapor Barrier
Once the area is prepared, you can begin laying down the vapor barrier:
- Measure the crawl space and cut the vapor barrier to size, allowing for overlap at seams.
- Unroll the barrier and lay it flat on the ground, extending it up the walls at least 12 inches.
- Secure the edges with staples, ensuring it adheres well to the foundation.
Sealing and Maintaining the Barrier
After laying down the barrier, sealing is crucial:
- Use adhesive tape to seal all seams and overlaps to create a continuous barrier.
- Check for any gaps or tears, repairing them promptly to ensure effectiveness.
- Consider using weights or sandbags to secure the edges against wind and movement.
Monitoring and Maintaining the Vapor Barrier
How to Check the Effectiveness Over Time
Regular monitoring of the vapor barrier ensures it continues to perform:
- Inspect the barrier every six months for signs of wear or damage.
- Check humidity levels in the crawl space; ideally, they should be below 50%.
- Look for any changes in air quality or new mold growth in surrounding areas.
Signs Your Vapor Barrier Needs Repair
Common signs that may indicate your vapor barrier needs attention:
- Visible holes, tears, or sagging sections in the plastic.
- Increased moisture levels or mold spots developing in the crawl space.
- Unpleasant odors emanating from the area, indicating possible moisture buildup.
Routine Maintenance Tips to Ensure Longevity
To prolong the life of your vapor barrier:
- Regularly clean the crawlspace to prevent dirt and debris buildup.
- Ensure proper drainage systems are in place to divert water away from the foundation.
- Maintain an appropriate level of ventilation to help with air quality.
Frequently Asked Questions
What is the best material for a vapor barrier?
Polyethylene plastic is the most commonly used material, known for its durability and effectiveness in moisture control.
How thick should a vapor barrier be?
Typically, a thickness of 6 mils is recommended for residential applications in crawl spaces, providing effective moisture prevention.
Can I install a vapor barrier myself?
Yes, with the right tools and preparation, vapor barrier installation can be a DIY project, but safety precautions are crucial.
How often should I check my vapor barrier?
It’s advisable to inspect your vapor barrier every six months to ensure there are no damages and that it’s still functioning effectively.
Do I need a vapor barrier in a dry climate?
Yes, even in dry climates, moisture can still infiltrate structures, making vapor barriers important for prevention against mold and deterioration.