
Understanding Island Lighting
What is Island Lighting?
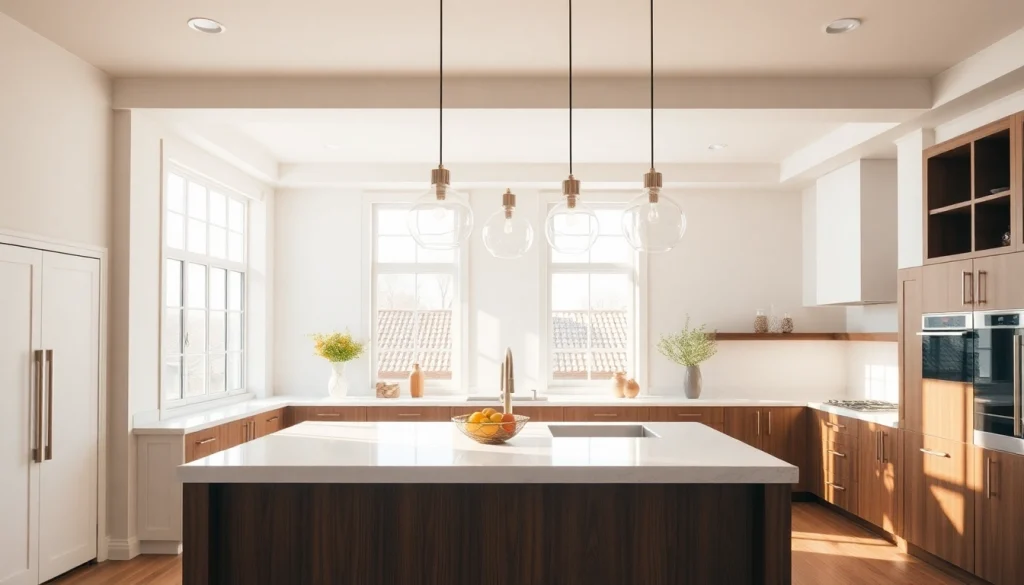
Island lighting refers to a specific category of fixtures designed to illuminate kitchen islands, bar counters, or similar areas in open-concept spaces. This type of lighting serves both functional and aesthetic purposes, ensuring space is well-lit for cooking or entertaining while enhancing the overall interior design. Fixtures often include pendant lights, chandeliers, and other specialized designs that draw attention to the island as a focal point in the room. A well-executed island lighting arrangement can transform your kitchen into an inviting space that not only serves culinary purposes but also acts as a social hub. Incorporating island lighting can elevate the atmosphere of your home significantly.
Benefits of Island Lighting
Choosing the right island lighting can offer numerous advantages:
- Enhanced Visibility: Proper lighting allows you to see details while cooking, prepping, or enjoying a meal, significantly increasing safety and usability.
- Visual Appeal: Customized island lighting fixtures can serve as design accents, adding character and style to your kitchen or dining area.
- Flexible Design Options: With a wide range of styles, sizes, and designs available, it’s easy to find fixtures that match your decor.
- Increased Home Value: Quality lighting is a sought-after feature that can enhance the overall attractiveness of your home when it comes time to sell.
- Ambiance Creation: Lighting can help set the mood for gatherings, casual meals, or intimate dining experiences.
Types of Island Lighting Fixtures
There is a diverse range of island lighting fixtures to suit various styles and preferences:
- Pendant Lights: These hang down from the ceiling and can be clustered or arranged individually for a dramatic effect.
- Chandeliers: Elegantly designed chandeliers can add a touch of luxury and sophistication to any island.
- track lighting: Adjustable track systems provide versatility, allowing you to direct light where it’s needed most.
- Flush Mounts: These fixtures sit close to the ceiling and can work well in spaces with lower ceilings.
- Under-cabinet Lighting: Placed beneath upper cabinets, this option provides focused lighting and enhances visibility without overwhelming the space.
Choosing the Right Island Lighting
Factors to Consider for Island Lighting
Selecting the right island lighting involves several key considerations:
- Size and Proportion: Ensure your lighting fixtures are proportionate to your island size. A large island may require multiple fixtures, while smaller islands might only need one.
- Height Placement: Consider the hanging height of your fixtures. They should be low enough to provide adequate light but high enough not to obstruct views or conversations.
- Style Compatibility: Match your lighting with the theme of your kitchen. Choose materials and colors that complement other elements within the space.
- Bulb Type and Brightness: The choice of bulb significantly impacts the ambiance; LED bulbs are energy-efficient and long-lasting, ideal for prolonged use.
- Adjustability: For maximum versatility, especially in multi-use spaces, consider adjustable fixtures that allow you to change the light direction and intensity.
Common Mistakes to Avoid in Island Lighting
While choosing island lighting, folks often make common mistakes that can undermine their efforts:
- Underestimating the Amount of Light: Insufficient lighting can lead to functional issues, so ensure ample illumination for the tasks performed in that space.
- Ignoring Scale: Oversized fixtures in a small kitchen or tiny lights in a grand kitchen can look out of place and disrupt the design harmony.
- Neglecting Layered Lighting: Focusing only on overhead lighting can create harsh shadows. Incorporate ambient, task, and accent lighting for a well-rounded approach.
- Misplacement of Fixtures: Be strategic about fixture placement; they should enhance, not detract from, the overall layout and functionality.
- Not Considering Future Needs: A fixed lighting solution might not accommodate changes in the kitchen, so think about adaptability during your selection process.
Color Schemes for Effective Island Lighting
The color temperature of bulbs plays a crucial role in how spaces appear:
- Warm Light (2700K-3000K): Ideal for creating a cozy, inviting atmosphere; great for kitchen islands used for dining or socializing.
- Neutral Light (3500K-4100K): Perfect for general task lighting, providing clarity and a balanced appearance without being harsh.
- Cool Light (5000K and above): Offers bright light that can enhance detail, suitable for kitchen tasks but may feel clinical if overused in social spaces.
By balancing these temperatures, you can create an environment that is both functional and inviting, tailored to moments of solo cooking as well as lively family get-togethers.
Installation Tips for Island Lighting
Tools Required for Island Lighting Installation
Before beginning your island lighting installation, gather the necessary tools:
- Drill and drill bits
- Wire strippers
- Screwdriver (flathead and Phillips)
- Voltage tester
- Lathe screws and anchors (if mounting to drywall)
- Wire nuts
- Ladder or stool for reaching high places
Steps to Properly Install Island Lighting
Follow these steps for a successful installation:
- Turn Off Power: Before starting, always ensure that power to the existing lighting circuit is off to avoid any electrical accidents.
- Choose the Ideal Location: Mark the precise spots where your fixtures will hang, ensuring adequate clearance and even distribution of light across the island.
- Install Junction Box: A junction box may be necessary for new fixtures; make sure it’s securely mounted and rated for the weight of your fixture.
- Wiring: Follow the fixture’s instructions for wiring. Connect the wires using wire nuts, matching colors (black to black, white to white, and ground to ground).
- Attach Fixtures: Once wired, attach your fixture to the junction box securely and adjust the height if necessary.
- Turn On Power: Restore the power to the circuit and test your installation to ensure everything works correctly.
Electrical Considerations for Island Lighting
Electrical considerations are paramount for safety and functionality:
- Consult Local Codes: Ensure your installation meets local electrical codes, especially regarding the number of fixtures and circuit capacities.
- Use Appropriate Wattage: Verify that the total wattage of your fixtures does not exceed the circuit’s capacity.
- Grounding Properly: Always ensure that your fixtures are grounded correctly to prevent electrical shocks.
- Hire a Professional if Uncertain: If you’re not confident in your skills, it’s worth hiring an electrician to avoid potential hazards.
Creative Island Lighting Ideas
Unique Styles for Island Lighting
Inject creativity into your island lighting with these unique styles:
- Vintage Industrial: Combine metal structures with Edison bulbs for a rustic yet modern touch.
- Minimalist Designs: Choose simple, clean lines for a contemporary aesthetic that matches modern decor.
- Art Deco Influence: Try bold geometric patterns and gold accents for a touch of sophistication.
- Colorful Fixtures: Bring personality to your kitchen with fixtures that incorporate vibrant colors or unique shapes.
- Nature-Inspired Designs: Use materials like wood or glass shaped to resemble natural forms, blending the indoor environment with outdoor elements.
Using Island Lighting for Ambiance
Utilizing your island lighting to create ambiance can completely change your kitchen’s feel:
- Dimmer Switches: Installing dimmer switches allows you to adjust brightness levels based on the time of day or activity, contributing to a cozy atmosphere.
- Layered Light Sources: Combine overhead fixtures with under-cabinet and accent lighting to create depth and warmth.
- Colored Bulbs: For themed occasions or seasonal events, consider using colored light bulbs to set a specific mood.
Trendy Fixtures for Island Lighting
Staying ahead of design trends ensures that your island lighting remains fresh:
- Smart Lighting: Incorporate smart bulbs that you can control via an app for convenience and energy management.
- Mixed Materials: Combining elements like metal, glass, and wood within a single fixture is trending and adds texture to your space.
- Geometric Shapes: Bold, geometric designs are gaining popularity for their artistic appeal that goes beyond mere function.
- Oversized Fixtures: Large, statement pieces can create a dramatic focal point, especially in open-concept designs.
Maintaining and Upgrading Island Lighting
Best Practices for Cleaning Island Lighting
Regular maintenance is crucial for longevity:
- Dust Regularly: Use a soft cloth regularly to dust off light fixtures and bulbs to maintain brightness.
- Check for Freon: Take care to inspect glass or plastic shades for any build-up or discoloration, cleaning them accordingly.
- Replace Burned Bulbs Promptly: Ensuring all bulbs are functioning allows for optimal brightness and performance.
Upgrading Your Island Lighting for Efficiency
Upgrading to more efficient lighting can save energy and enhance functionality:
- Switch to LED: Consider replacing incandescent bulbs with LED equivalents which offer longevity and energy savings.
- Install Motion Sensors: Adding motion sensors can help regulate lighting depending on room occupancy, saving energy and enhancing security.
- Utilize Smart Controls: Upgrading to smart controls allows for programmable settings that maximize efficiency based on your schedule.
When to Replace Island Lighting Fixtures
Not all fixtures last indefinitely; know when to replace them:
- Frequent Bulb Burnouts: If you’re regularly changing bulbs, it may indicate a need to replace the fixture.
- Visible Damage: Signs of wear or physical damage suggest it’s time for a change, especially on fixtures prone to rust or corrosion.
- Outdated Style: If your fixtures no longer fit the desired aesthetic of your kitchen, consider an upgrade for improved visual appeal.
Frequently Asked Questions
What is the ideal height for hanging island lighting?
The general guideline is to hang island lighting 30-36 inches above the countertop to provide adequate illumination without obstructing views.
How many pendant lights do I need for my island?
Typically, three pendant lights are ideal for a standard-sized island, but this can vary based on the fixture size and layout.
What are the best bulbs for island lighting?
LED bulbs are recommended for island lighting due to their energy efficiency, longevity, and available color temperatures.
How can I create ambiance with island lighting?
Using dimmable fixtures and layering lighting with various sources can significantly enhance the ambiance around your kitchen island.
Should I hire a professional for installation?
If you’re unfamiliar with electrical work, hiring a licensed electrician is advisable to ensure a safe and compliant installation.